
Another huge project is in the box! If I look back, me and Yvonne (aka “Alice in Wonderland”) exchanged our first concepts in September last year and “Down the Rabbit Hole” was one of the ideas. So now, 6 months and numerous sketches later, we finally set our sails to shooting the first episode.
Concept for Alice in Wonderland – Down The Rabbit Hole

Alice in Wonderland is a story about growing up, running out of time (play time, time to be a child, time to enjoy the life), wanting to become an adult, but fearing the consequences of taking the leap. Lewis Carroll wrote the story in 1865 as a gift to the daughter of one of his friends. That’s almost 150 years ago! Ever since then, Alice has captivated billions of readers, inspired several movies, animated series, comic books and, of course, invoked the interest of that curious bunch of people who call themselves photographers. Seriously, it’s become almost sort of pointless to do an Alice photo shoot, because it has been done so many times before. This meant, we had to try to do something original and find our own interpretation of the story.
There are a couple of things that I really wanted to experiment with in this project. One of them was a special kind of image aspect ratio, roughly a 2 x 1 portrait format. It’s not an ideal format for monitor viewing, but it fits our story well and will look great on a large print. I also wanted to experiment distorting the perspective in this tall image, so that we would both be looking down on the floor and up towards the opening in the same image. I was thinking less from a photographer’s perspective but more from a that of a comic designer who can twist and shape his perspective any way he wants. There were some hefty dilemmas to solve however:
1. Where could I find a rabbit hole to shoot?
2. Having such a distorted viewing angle, wouldn’t that also distort the model?
3. How could I pull off the flying pocket watches?
4. How could we source some pocket watches?
5. With the light coming from above and Alice sitting in the position she is on the sketch, wouldn’t her face lie in shadow?
6. Wouldn’t the flying watches cast (a) shadow(s) on both Alice and the floor?
… as well as some general technical considerations about the background separation (with potentially all the brightest elements on top bunched together and all the darkest ones at the bottom) and the overall color concept of the photo.
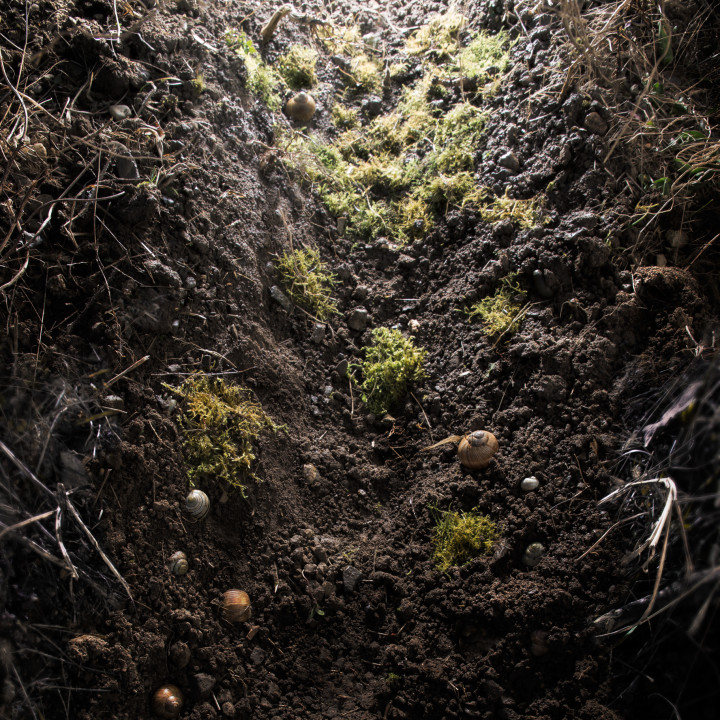
One by one, these questions got solved by both careful planning, experimentation and in some cases, moving back to the drawing board. For the rabbit hole we had a couple of ideas, starting with looking for an actual hole to shoot. But since we are living in Switzerland, a big gaping hole is considered a health risk and how would we go about shooting it IF we found one? so how about building a big half-pipe in my studio and filling it with dirt? Too much waste and too dirty – scratch that idea. Building a small miniature version and cover it in modelling dirt from the miniature train shop? Not enough detail, will look fake – scratch that idea too? So finally, we ended up deciding to have to do some digging ourselves. We asked around and my friend Denise would let us dig a trench in her allotment garden she recently took over from a senior neighbour. So a week before the studio shoot of Alice in Wonderland, me and Yvonne met in Denise’s garden, dug a trench of about 1 m and decorated it with collected roots, moss, pebbles and snail shells. It was lit with a Elinchrom Ranger RX with a 21 cm standard reflector bowl . Since we were shooting in Daylight, Yvonne was holding a scrim to to soften the direct sunlight, but still use some of that available light as fill light. That background was shot with a Canon 6D at 24mm on a small aperture (I think it was around F/16). 24mm wouldn’t be enought to distort the angle the way I imagined, so I set up the camera on a tripod and shot several frames while tilting the camera upwards along the axis of the trench. These shot would later be stitched together in Photoshop. I enhanced the feeling of a round hole by applying a warp distortion on the photo in Photoshop, pulling down the sides at the bottom and up at the top. These created a little bit of image quality loss on the side, which I coverd up with separately shot photos of dried roots and branches. When ready to shoot we sprayed some water on everything to make the earth more damp and the shells, moss and pebbles more shiny.
Here’s a rotated version of the prep shoot.

Meanwhile Yvonne was busy asking around for people that own pocket watches. Together with two of her own, she managed to source seven beautiful watches! It was very clear though, that these should not be brought in direct contact with wet dirt! So they would have to be shot separately in the studio.
Studio Shoot
Saturday, 15th of march 2014, time for the final shoot. Our team had now grown to include Patricia Rüegg, a make-up artist from Graubünden. She saw our shout-out about a place for the prep shoot and was happy to join us.


Our first task was to shoot Alice herself. We did experiment with a couple of poses and ideas. It was as I had suspected the top-down lighting would keep her face in shadow if we don’t use a strong fill light. A strong fill light would destroy the realism of the lighting. So we changed her pose to look up towards the lighting. Also we experimented with holding an object above her head to simulate a watch casting a shadow on her. Which ever way the shadow fell however, I didn’t like how it looked. So we decided against that as well.


The main light is a 21 cm reflector bowl with a narrow grid – this single light simulates the light comming from the sky outside of the hole. All the other big lights are on low power settings and just act as fill lights from the light bouncing around the cave. The gridded deep octa next to the small reflector bowl was on a little bit of a higher setting to put some accent light on her face and chest.
Next up, the watches. Again I had several possible approaches to this. #1 Shooting them on a glas surface to be able to light them from all angles while being able to have the chains lie in arched configurations (as in the original sketch). I experimented the night before with that idea and found it difficult to lie down the chains in beautiful shapes. Also, looking at those results, I was missing some spacial depth in the chains as they were clearly lying on a surface. And of course, masking them out would be a huge pain. So I simply didn’t have a solution that would be straight-forward and realistic looking. So I scratched that approach. I thought about it for quite some time and decided that hanging watches work as well, which would be MUCH easier to accomplish. So on shooting day, we hung the watches from a small boom arm and lit them with a beauty dish and two big reflectors to either side of the camera. While that would definitely look very nice. It was almost too perfect. The watches looked like they have been shot for an advertisement…


Still, I made a rough composite with the photos to see if Photoshop could fix it and make it look “real” again. There I discovered that I might have bitten off a little more then I could chew. In order to make this look real, I’d have to a) shoot them from the perfect angle, b) set the light in the absolutely perfect place, depending on the watches orientation in space c) shift the focus slightly in front of the watch for the watches that would be further away from the viewer – creating a sense of spacial depth and d) if I’d ever intended to add smoke to this ring of watches, I’d be problably much easier off, just shooting all of these watches together. That gave me an idea! So what if I would build a ring to hang these watches and put a light on top of this ring and THEN blow some smoke through a drinking straw through that ring. Well then that would solve a lot of problems, but with the smoke being semi-opaque, it would become very difficult to blend it with the background from the prep shoot. However there WAS a solution for that too. I recently watched RGG Photo’s 3 day workshop on CreativeLive on commercial photography techniques. They shot a whiskey bottle in front of a backlit material with a print of the background scenery on it. They did that because it’s impossible to fake the light bending from a real scenery through a glass surface. With smoke it’s a similar problem, it’s difficult to fake convincingly. You can of course use a smoke brush and paint in some smoke – but then you’d forget about how light gets scattered going through smoke and how the smoke would mirror on nearby reflective surfaces. These are of course fine details, but my new solution would take care of all of that in one big swoop. Check this bad boy :).

The only problem with this solution is that the sensor pixel count vs the pixel count of my screen (An 26-inch Apple Cinema display rigged on a light stand with a C-Clamp). Wherever the focus plane would hit the computer screen, I’d have to deal with serious pixelation. But as my Camera was slightly shooting from bellow and the watches were the center of focus, the computer screen would be out of focus, just enough to blur the pixels. As I had intended to add artificial lens blur to the top of the rabbit hole to make it seem more distant, this method sort of took care of 5 flys with one stroke. So okay, in the lower part of the image, the focus plane and the plane of the screen do collide, but there I’d simply blend in my original file in Photoshop. If you haven’t noticed it yet, I feel quite excited about this contraption. It’s a little crazy, but elegant, low-cost and easy-to-build. And last but not least, it combines all the elements I was hoping for. Here is one of the roughly 200 exposures I took trying to get the smoke just right… and one where the screensaver kicked in ;-).


At this point it’s 4 am and I’ve been working since 2 pm. Time take a rest and return to work the next day.
Post-Production
The post-production took about 10 hours. A lot of it was due to me wanting to give something a shot to see how it pans out. After all I’m doing this to learn new stuff, so there is no pressure to get things done swiftly. One of the things I changed drastically was the color look. I try to stick to a two- or three-color look, following the rule “less is more”. This way, the two colors define a coherent look. My approach to this is: I look at the strongest colors in the photo and decide which ones I can nudge in a direction to make things simpler. For our image it’s:
- Alice’s hair: BLOND-GOLD
- Alice’s dress: CYAN
- Alice’s skin: ORANGE/PINK/YELLOW
- pocket watches: GOLD
- earth tones: BROWN
- some of the greener: GREEN
I wanted to keep Alice’s hair and dress in prestine color, so everything else had to be corrected slightly. The watches were close enough to her hair tone. Her skin I nudged only a little bit, to make it a little bluer. But the bulk of the nudging was done on the brown of the earth and on the greenery. Doing so removed a lot of the distracting redness in the earth (and skin). You can compare the before and after with the header photo of this blog as well as the final image bellow (click on it to see the full-size version).
