
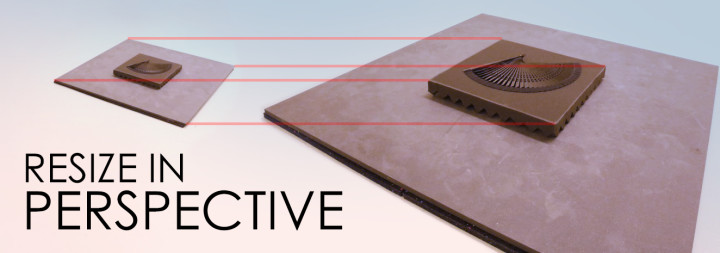
Introduction to the effect of oversized objects for artistic photo manipulation
You’ve probably all seen that specific effect used in many creative photo manipulations. Enormously oversized objects are placed in an otherwise natural environment and due to their size, they become carriers of meaning and symbolic connotation. Almost everyone believes, that this can only be achieved with some kind of digital image manipulation. And if you aren’t into building giant props in your workshop, that is of course true, but probably a little differently than you’d expect.
We all know that when we use a telephoto lens OR when we get closer to the subject, we increase the subject’s size within the frame. It should then be easy to shoot the oversized object separately and then add it on top of a normal-sized background using layers in Photoshop. I will show you some of the pitfalls and how to get around them. If we are shooting a three-dimensional object, there is this tricky thing called perspective that depends on the object’s spatial attributes and our eye’s (or camera’s) distance and position relative to the object. If the object we are attempting to shoot in jumbo-size doesn’t have the correct perspective, light and depth-of-field – it will be much easier to spot the fake.
Maintaining the correct perspective and vanishing points
Perspective and vanishing points are normally explained using a cube that stands in a three-dimensional space. If this cube is drawn correctly (aka drawn in perspective), each set of parallel lines within the cube will converge to a point in space, usually outside of the frame – the vanishing points. Architectural photographers battle with these vanishing points, because if they don’t shoot a building straight on, its vertical lines will seem to lean inwards. This is often corrected with a Tilt-Shift lens or by correcting perspective distortion in Photoshop. These vanishing points also tell us a little bit something about the focal length chosen by the photographer. The wider your lens, the more perspective distortion the photo will have. Decreasing the focal length (e.g. changing from 35mm to 24mm), the vanishing points will all come closer and closer to the image center, which will make the subject look bloated. On the other hand, if there were such a thing as an infinitely long lens, the vanishing points would move out to infinity and all parallel sides of the subject would also be perfectly parallel in the photo.

parallel sides in a cube converge to their vanishing points, one for each axis
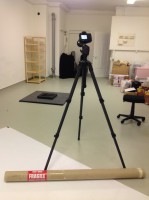
There are two techniques we can employ to increase an object’s size. The first is increasing the length of the lens (focal length, or “zooming in”) and the other one is getting closer to the object. Both can be used to resize an object, but only one will maintain the correct perspective! You must never change your focal length for this! Why not? As I’ve explained in the previous paragraph, when we decrease the focal length (aka “zooming out” or changing to a more wide-angle lens) the vanishing points will creep towards the center of the image which changes the perspective and the resulting composite will always feel fake. The only option you have is to shift your camera closer to the object. Now, why didn’t I just say “move your camera closer to the object“? Because, there are three kinds of movement, and two of them must be avoided at all cost, PAN and TILT. Pan and tilt both mess up perspective by roating the vanishing points either horizontally (pan) or vertically (tilt). So you can only shift your camera forwards and backwards, to either side, up and down. And of these directions, only the up and down-ward shift is possible without moving your tripod – by raising and lowering the center column of your tripod. The two other directions can only by achieved by picking up the tripod and moving it forward or to the sides.
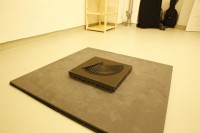
There is a very simple and handy trick to make sure that you don’t accidentally pan your camera while moving the tripod from one position to the other. When initially setting down your camera for the background shot, make sure that your tripod’s front legs are in a horizontal line, 90 degrees from the wall. It’s very handy when your floor has some sort of rectangular pattern, because then you can use the lines from this pattern to align the tripod’s front legs. When you are done setting up that shot, make absolutely sure that your tripod head is absolutely locked down! For the photo of the enlarged object you simply pick up the tripod and set it down closer to the object, paying close attention to have the front legs in a perfect line according to your rectangular floor pattern. If you don’t have a studio floor with a rectangular pattern, like me, your work will be a little more tedious, because you’ll have to work with other guides. I figured out one way to do it today using a large roll of packaging material. If you roll that on the floor it can only go in one direction (forwards and backwards). So I used it to align the feet of my tripod.
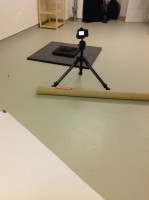
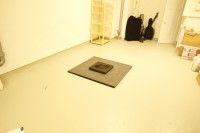
Make sure that the roll is as even as possible, little bumps or other irregularities will increase circumverence on that side of the roll and it will not move perfectly straight. Larger roles produce more consistent results as well, because small irregularities will not me magnified as much over a certain distance. Here are the two resulting pictures. These are two square boards on top of each other. You can see that the outer square of the first picture corresponds perfectly to the inner square of the second one. This was shot with a 24mm lens to exagerate any perspective distortions. Like I showed above, because I didn’t change the focal length and followed the NO-PAN-NO-TILT rule, there are no perspective issues. Q.E.D., so to speak :).
Shifting towards the object makes sense, doesn’t it? It is the main factor that increases the aparent size of the object. But why do you have to shift sideways and upwards? Well, that’s because your object will grow away from the image center. If your object is in the dead center of the image and on the same height as your camera to start with, you might be in luck, and it will just grow in all directions at once and you only have to shift forwards. But even then, if your object was for example sitting on a table it will also grow downwards inside the table. So you have to offset your object by the amount it grew underneath the table’s surface by shifting your camera down by the exact same amount. This will raise your object accordingly and set it back on the table’s surface. You probably could calculate the exact amount of offset (sideways and upwards shift) using all kinds of semi-fancy math, but to be honest, it’s easiest to just go for trial and error. As long as you maintain the NO-PAN-NO-TILT rule (with the tripod-leg-align trick) and stick with the same focal length, you’re on the right track.
A little trick: To make my life easier, I shoot the background layer twice, once without the object and once with visual guides that outline roughly where the jumbo-sized object should end up. For the checking process I use the photo with the markers and for the final composite I use the one without. Easy peacy. Right? Sadly no, not quite yet. While we maintained the correct perspective, we also have to correct our light sources, our next topic.
Correcting the light sources
So we have increased the objects apparent size. I say apparent, because of course it’s just an optical illusion. We just increased the size of our object my moving close to it. However this means everything else in the scene has grown in size, including the distances between our object and its light sources. So relatively speaking, our light sources are now to far away and to large in diameter. Let’s look at this with an example. your object was 10 cm high in its natural size – well, now it has grown to 5 times that size and so has that small softbox you used to light it with, the formerly 70 cm x 70 cm softbox is now a giant 350 cm x 350 cm softbox at is five times as far away from the object as before. Aha, you’ll say, but way a stinking second there buddy boy, “if the apparent size of the light source relative to the subject is the same, then softness of the light will still be the same. And that does sound like a situation where the apparent size of the light source actually doesn’t change because distance and size of the light source are increased equally. And again, you would be very correct. And yet again there are two caveats. First of all, softness (or diffusion) of light isn’t everything. There is also the matter of the light fall-off over distance. The inverse-square law shows us that as distance increases light falls off more slowly. Granted that isn’t as dramatic of a caveat. It would have to be a really large object where this would come into account, like for example a giant bottle of nail polish right next to a street lamp. But do you remember when we had to offset our object because it would grow into the surface it touches? In that instance the lights should be offset as well by the same amount. The 20 cm we had to shift our camera down to set the object back on the table surface would also lead to shifting all the light sources down by 20 cm. These adjustments are in most cases not critical. But in extreme situation it’s important to be aware of this and think about resizing the lights according to this rule: if your object has increased n times in height, you have to move the light sources five times closer to the object and reduce the size of the light modifiers to a fifth. That and the offset rule, in case your objects sits on any kind of surface (or is hanging on the wall).
How about Depth-of-Field (DOF)?
You’ll be glad to hear that the worst of the jumbo-sizing tutorial is behind you. Because Correcting the depth of field is actually not that difficult. All you need is a depth of field calculator. If you increased your object’s size let’s say five times, your depth of field should also shrink five times in absolute terms – because in realitve terms the DOF should remain constant, because you want to maintain the illusion that neither distance nor depth-of-field have changed for your object. So first you have to calculate your original DOF. If you shot a 50mm at F/4 at a distance of 5m that would amount to a DOF of 154 cm on my DOF calculator. So now you’ve shifted your camera to about a meter away from the object and its apparent size increased five times. Your new DOF should be 154 cm / 5 = 30.8 cm. Your DOF calculator will tell you in order to get a 30.8 cm DOF at a distance of 1 m you’d have to have an aperature setting around F/22. That’s stopping down your lens pretty dramatically. So it might be advisable to do the calculation ahead of time. Because maybe your camera can’t shoot at F/64 – I know mine can’t.
To further complicate thing, if your aperature changes, so will the amount of light hitting your sensor. F/4 to F/22, that’s a 5-stop decrease of light. As usual you could either compensate that by raising the power of your flash by 5 stops, but since most studio flashes don’t even have a much more then a 5- or 6-stop range, this could prove to be difficult. The other way to compensate for the loss of light is an increase in the ISO setting of your camera. If it was ISO 100, the ISO would hop five times (100->200->400->800->1600->…) to ISO 3200. That is barely usable as well. So it’s probably best to increase the power of your studio lights as much as you can and then compensate the remaining stops by an increase in ISO.
Final words
It seemed like a very straight-forward solution, just moving the camera closer to the subject to increase its apparent size, didn’t it? But as I’ve shown there are a lot of fine details to think about if you want to get it done perfectly in camera. And if you take the time to consider these points and prepare accordingly, you’ll be rewarded by flawless photo material for your composite. I’d be happy to hear your experiences with the process in the comment section – also if you use a completely different approach.
I hope you enjoyed this rather technical blog entry and wish you lots of luck with your own experimenting and photography.

How To Build A Ship In A Bottle

Raquel (2016)
Excellent post. You just help me upon a huge problem for me
By the way , your pictures are just wonderfull…
I measure the work i have to do…
Thank you, very glad my article was helpful. Me too, I was looking for a long time on how to approach this, but nobody seemed to know exacltly how to do it. In the end, I took on the challenge and figured it out myself, which was a lot of fun. Good luck with your photography. I’d be happy to see the results of your experimentations.
A part of my pictures are here
https://www.facebook.com/pages/SMART-Photographies/287072411422643
Dont’ be rude i’m just begining with manipulation (4 months)
SMART
no reason to be rude. I like your work :). Some of it is really original. Keep it up.
Sorry for posting again
I think about using small lasers fixed to help moving it without panning or tilting
That would be much more precise indeed. If you’ve got access, why not. Precision is important here.
[…] sized objects, there are a few rules to follow. Some of which I’ve mentioned in my blog post How To Create Oversized Objects For Photo Manipulation Using Camera Shift. As with the greenscreen in motion pictures, it’s a good idea to give the greenscreen actor […]
Amazing and helpful tutorial! I am gona try that out with my new camera. Thanks a lot!
Hi :). Thank you for your comment and good luck with these techniques. Keep in mind though, that this is only a theoretical approach. In real-life there are many other considerations and limitations to keep in mind, as I just witnessed in my newest project. The theory is a good start though.