
Cheap and easy-to-make!
For years I’ve been wanting to do these for my photography studio. And since it’s winter time now and the business is kind of slow it seemed like the perfect time to do some research and build them in a do-it-yourself kind of way. I’ve seen a couple of different ways to build them, but wanted something that can be used in a variety of ways and so I came up with my own little solution. The big surprise to me was how cheap and easy they were to make.

Purchase List
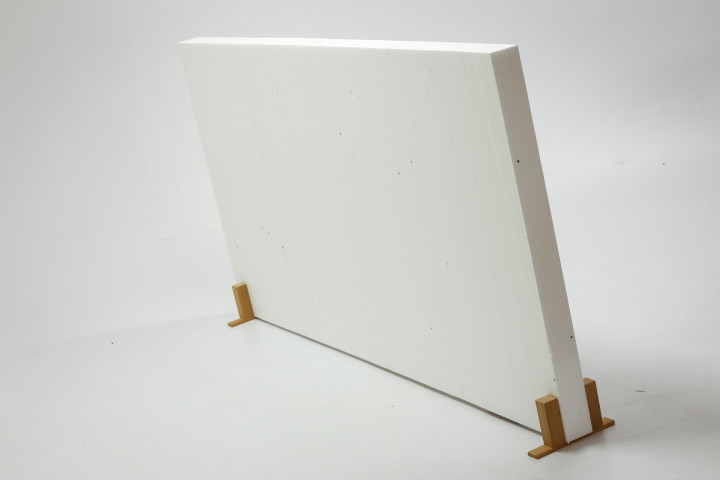
So we are making two sets, each consisting of one big (1 x 2m) polystyrene reflectors (also called styropor or styrofoam) and two removable feet to hold up the reflector.
Your purchase list:
- 8 sheets of polystyrene EPS15 (1 x 0.5 m). Suggested thickness: 8 cm. Price: 48 CHF
- wood glue, Price: 5 CHF
- 1 m construction wood (1 cm x 4 cm), another 1 m (4 cm x 4 cm). Price 20 CHF
- Some wood nails and a hammer
- (optionally): a 1 liter bucket of black indoor paint and paint roller
That’s 73 CHF (60 $, 55 €) for two big stand-up reflectors (not including the paint)! Not bad at all.
Glueing the polystyrene sheets
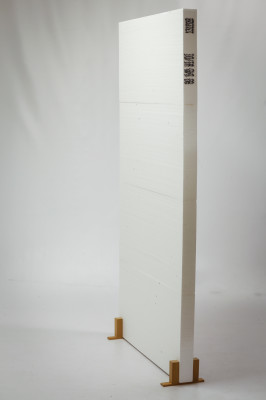
Ideally, I wanted one large sheet of polystyrene that’s already 2 x 1 m. But those aren’t available in Switzerland. The good news is however that wood glue works perfectly with polystyrene, so you can buy the 0.5m sheets (which are easier to transport home anyway) and glue four of them together. After you’ve glued together four sheets on their long side, stacking them up to a height of 2 m, you have to let them rest for 30 mins until the glue has dried.
Building the wooden supports/feet
Time to make the wooden feet. My solution is a non-destructive one. The feet aren’t screwed or glued to the boards, but can slide in and out, so they can be attached to any side you like. So your reflector can be used in either a landscape or portrait configuration.
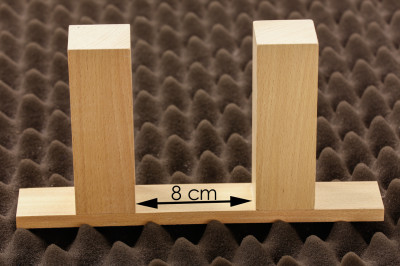
Cut the flat piece of construction wood into 4 pieces (each 25 cm long). These will build the base of the support feet. My neighbor is a carpenter and they cut the wood for me in 2 mins. But if you have to saw it yourself make sure it’s cut at a right angle, which is especially important for the next pieces, the side supports: Cut the 4x4cm wood into 8 pieces (each 12.5 cm). Use a little bit of sand paper if you like, so there are now wood splinters on your studio floor.
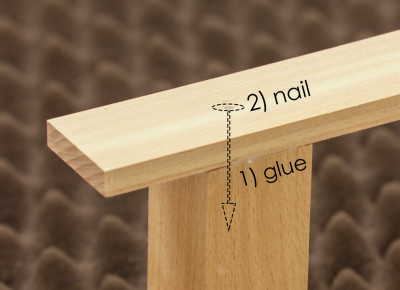
Apply glue to the bottom of two of the 4x4cm pieces and use the side of one of the glued polystyrene board as reference to press them on the 2x4cm base. It has to be a snug fit, so the board won’t wobble around while stuck into the support feet. Let the glue dry for 5 mins and then turn them upside down and hammer in a wood nail into base for each of the side supports.
And voila. You are done.
Optional feature: A light-absorbing side.
If you’d like your reflector to double as a black reflector (suck up light, rather then reflect it). You can buy black interior paint and apply it to one side. A liter bucket of paint will suffice for two boards, if you apply two layers of paint.
I hope you enjoyed this tutorial. If you have any questions, ask them in the comments.
Good luck,
John
[…] so I can get into position. Behind me are two large V-banks, for which I’ve written a do-it-yourself blog post recently. The model camera in my hand is my trusty old Canon 5D mark II, a piece of my soul on its […]
do you happen to recall the density of the material you used in pounds? 1lb, 2lb or 3lb?
thx
Hi Rich,
to be honest, I don’t know. I’d have to see the styrofoam to be able to make a good call. I’d probably go for medium, just to be on the safe side. If the one with the least density still holds up fine (structurally), the light weight is a bonus. But that’s all I can say about that…