
Tutorial “The Smart Man”

Equipment used:
Hasselblad H4D-31, HC 3,5-4,5/50-110mm @ 80mm, 1/320s, F/8, ISO 100. Three Elinchrom D-Lite-it 4 strobes (1 beauty dish /w grid, 2 standard reflectors w/ grid). A Canon 580EXII speedlight with a red gel. Triggered with Pocketwizard Plus III. Manfrotto MT057C3 tripod.
The Concept
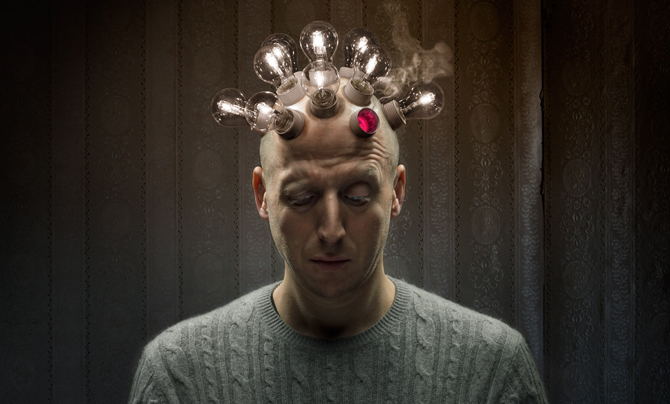
Where do good ideas come from? We all seem to have them on occasion, but only very few people are blessed with the brilliance of a true genius. The general scientific consensus is that being smart is both a result of genetic disposition as well as an engaging and mentally nurturing upbringing. It doesn’t stop there though. Being smart is an ongoing process. The true genius has to constantly keep pushing forward, pursuing his goals. Facing new challenges, he struggles like everyone else. However he is able to learn from his blunders and turn them into discoveries – sometimes even groundbreaking ones. If an idea or approach doesn’t show any merit, he doesn’t abandon ship but simply tells himself “back to the old drawing board”.
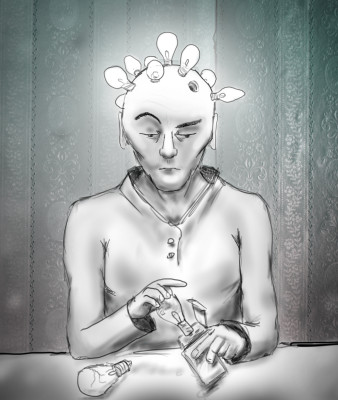
Like all conceptual photos I create, I work towards a strong relationship between the person I am shooting and the story concept. For “The Smart Man” it started with a very simple metaphor of “idea bulbs over one’s head”. I soon decided I had someone specific in mind as the model. His name is John Wilhelm, probably Switzerland’s best known photographers / photoshop artists and winner of several international photography awards and publications. It’s only recently that I’ve gotten in touch with him and wanted to do a collaborative “John & John” project ever since. I started with a sketch drawing not just as a tool to communicate my idea to John, but also to be able to project on paper what’s in my head. Similar to writing an online, sketching is a great tool to develop, substantiate and enrich an idea. When I’m drawing, I am mentally simulating the photo shoot with a pen and it is therefor my preferred method to verify my composition and the emotional impact of my concept. Adding details, color, light and shadows, I gradually become aware of upcoming technical challenges: Where would the light be coming from and how would it shape the person’s face? How would I go about faking that lighting – or sometimes even more importantly, how would I fake the shadows! Will there be enough separation in brightness between the person and the background? I’m shooting directly into light bulbs – isn’t that going to cause some sort of contrast issues? Won’t his eyes be too much in shadow with light coming at this angle? What clothes should he wear? And so on. I’m quite the analytical person, but apart from all these technical considerations, sketching also helps me to see if my concept “feels right”. If my guts tell me that there is still something missing, my first instinct used to be to add more elements. This is something I’ve come to watch out for though. Rather then making the image more complex, I try to rethink the concept, make it rounder, more complete. With “The Smart Man” the element that finally made the concept complete, was the broken bulb as well as the new bulb he pulls out of the box. Those elements clearly create a narrative with a past, present and future – failure, repair and recovery.
Preparations
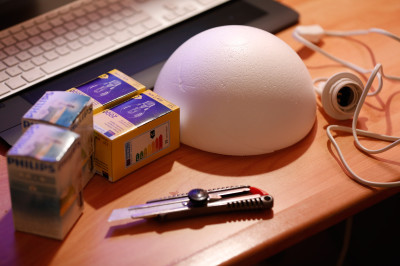
The technical main challenge for this photo is probably evident to anyone: How can I put burning light bulbs into a person’s head without causing irreparable damage to their skull – and make it look realistic! A few years ago, as an unexperienced photo illustrator, I would have simply shot a light bulb at different angles and then combine them in photoshop on the model’s head. This approach would have led to an image that looked unrealistic from miles away, because I would have shamefully neglected the shadows. The shadows are always just as important in a composite as the light and/or lit surfaces! Plan for the shadows! This can be even more challenging then planing the light. For this project, I simply didn’t know what kind of light and shadow patterns there were to be expected if one screwed light bulbs into someone’s head. So there was no way around it, I had to build an some sort of artificial head with light bulbs, a contraption that I later labeled the Smart Hat. At our local construction supplies store I found a hollow half-sphere made out of polystyrene which had roughly the size of human head (at least the top half). In the lighting section of the store I also found light sockets with switchable power cables. Perfect! No soldering required – whew! I purchased a couple of bulbs with the lowest power output I could find. The next step was to cut out the holes for the sockets.
Lighting
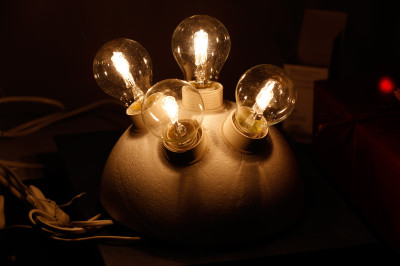
As I did some test shots of the “Smart Hat”, I noticed one problem. This one empty socket gets a kind of lost being surrounded by all these brightly burning bulbs. It needed a little something extra to make it stand out and tell its own crucial part of the story. So I decided to light it separately from underneath with a speedlight outfitted with a rec color gel (from zebraflash.com). The addition of smoke was one of the last changes to the concept. While shooting the Smart Hat I puffed some smoke through a straw pointing at the socket from underneath.
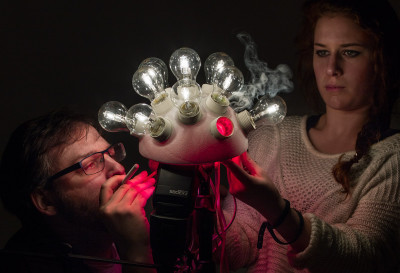
Once the Smart Hat hat was shot, we removed it and started preparing for the main shoot of the Smart Man. We set up the table and positioned three studio strobes to simulate the light from the bulbs on his head and shoulders. After experimenting a bit, we settled with a gridded beautydish on a boom, pointing straight down on the model’s head. In order to accent the light on his shoulders and the sides of his faces, two additional strobes were setup up in hair light positions on both sides. Both of these were fitted with standard reflectors with narrow grids in front. The white cloth on the table acted as a reflector, which helped to get some light in areas that weren’t directly exposed to the three strobes.
Shooting

Time for the model to arrive. After deciding what to wear for the photo, we started to work on the facial expression and posture. I wanted something that looked controlled, self-confident and calm. The camera was slightly pointing downwards which would create a plane of focus that is leaning backwards, so that both face and hands should be in focus. I am shooting on a digital medium format camera, so the DoF is narrower than on 35mm cameras. As with any camera, the DoF could be increased by a smaller aperture, but my studio strobes won’t output enough power for anything beyond F/13 and raising the ISO is definitely not an option with the CCD digital backs.
I shot each facial expression twice in sequence. Once with all three strobes firing and once with just the overhead beautydish. Why twice? Remember “planning for the shadows”? The first shot would become well suited for areas where the full and direct bulb light would hit the model, whereas the second shot was intended for shadows and indirectly lit areas! Having both would allow me later in Photoshop to paint these darker areas where needed. Ideally, the second shot should have been lit separately with a low-powered big diffuse light, but for this setup, it was good enough. Having my assistant yanking the power cord out of the socket between each of these two shots enabled me to fire both in rapid succession and therefor John was able to keep perfectly still for both shots.
Post Production
First I selected the best source files for the composite, which would be one for each of the following shots:
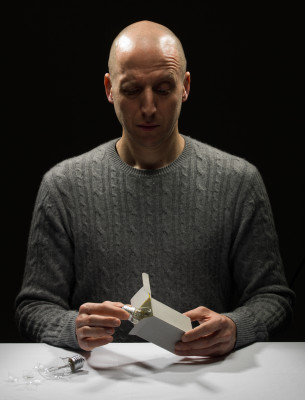
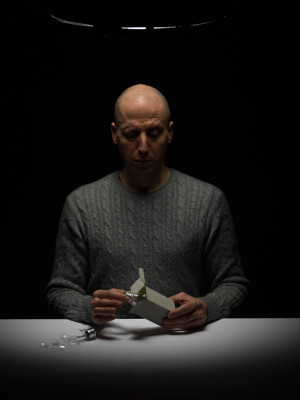
Photo #1: Smart Hat
Photo #2: Photo of John with all three strobes (to be used for lit areas)
Photo #3: Same expression/posture but hair lights turned off (to be used for shadows)
Photo #4: Background photo, from my library of my own textures.
I started by aligning the Smart Hat with John’s head and cut out the bulbs and sockets with masks. For the shadows of the light bulbs I applied three steps:
Put the shadows from the Smart Hat on a separate layer. Set the blending mode to multiply and the opacity to 44%. This will show the shadow areas on the skin, but it’s still to bright.
Replace all skin underneath this shadow areas with skin from Photo #3. The skin in this photo is darker.
Dodge and burn the shadows (using a 50% gray-layer in Overlay)
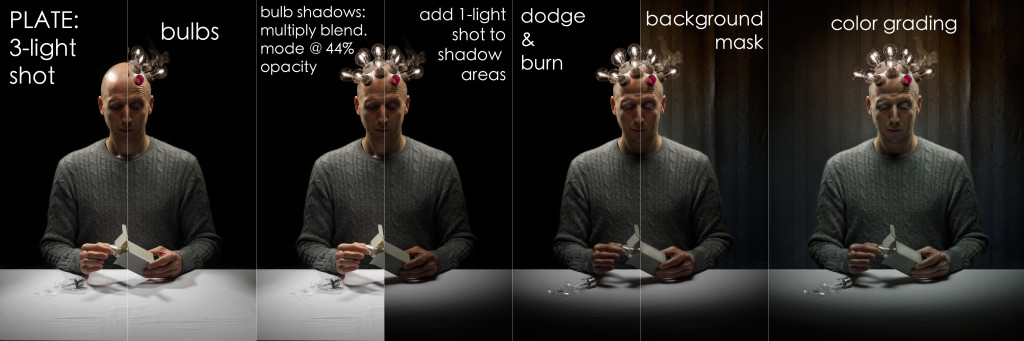
Wherever the light from the bulb would hit the skin or shoulders I used photo #2 (the one with full lighting) and wherever the light would be in shadow I used photo #3. On the table surface, I used photo #3 as well, because I liked the light/shadow transition on the table cloth caused by the beauty dish. It looked a little like a vignette.
I was able to bring the colors of the four shots pretty close together using the RAW converter – but the result still wasn’t perfect. So I used a trick I picked up from master photographer and photoshop artist Eric Almas. He uses a solid color layer on top of everything at a very low opacity of 5% and blending mode “color”. This pushes all colours towards that little bit of extra color and unifies all layers, creating a certain look. The color I’ve used for this is green – but at 5% the effect is very subtle.
Doing the post-production at night, I often end up with images that are a little bit too dark for printing. So I make a point of returning to the image at daylight and end up brightening the shadows a little bit more almost every time. If it’s intended only for digital publication, I look at the photo on a second (cheaper) monitor to see how the image would hold up for viewers that don’t have a high-end screen. The process is comparable to that of a sound engineer listening to the final mixdown on different loudspeakers – he also has to compromise sometimes with regard to his listeners with lower-end equipment.
https://obsoquasi.ch
https://www.facebook.com/obsoquasi
[…] The full tutorial on this project can be viewed on my blog: Tutorial: The Smart Man […]
Wow, i love it! Great concept, thank you for the tutorial.
Glad, you liked it, Roberto 🙂
Ihre Fotografie ist einfach großartig und ‘trifft bei mir mitten in mein Fantasiezentrum’ 🙂
Ich bin begeistert….wenn ich den technischen Verstand und das nötige Equipment hätte, so würde ich wohl ähnlich arbeiten.Sagenhaft!
Liebe Grüße aus Ulm
Birgit Fohlert
bfohlert.wordpress.com
Liebe Birgit, herzlichen Dank für deinen netten Kommentar! Wahrscheinlich hast du’s ja schon viele mal gehört, eigentlich braucht’s weder Spitzenequipment, noch einen Hochschulabschluss. Brooke Shaden zum Beispiel, der Name sagt dir sicher etwas, arbeitet fast ausnahmslos mit Tageslicht, einer Canon 5D mark II und einem 50 mm Objektiv. Und ihre Arbeiten hängen in grossen Galerien rund um den Globus. Ich glaube die einzigen zwei Ressourcen, die’s wirklich braucht ist Zeit und Mut zum Ausprobieren. Es gibt ein Universum an Möglichkeiten zu entdecken.
Liebe Grüsse, John Flury