
In this tutorial I’d like to demonstrate that you don’t need expensive studio flashes to create a complex scene with subtle lighting. I haven’t yet seen anyone else do this quite the same way and there doesn’t seem to be a name for it, so I named the process “zone-lighting”, a form of exposure blending by dividing the scene in different zones. But let’s start with a little bit of background about the project and its concept.
The concept
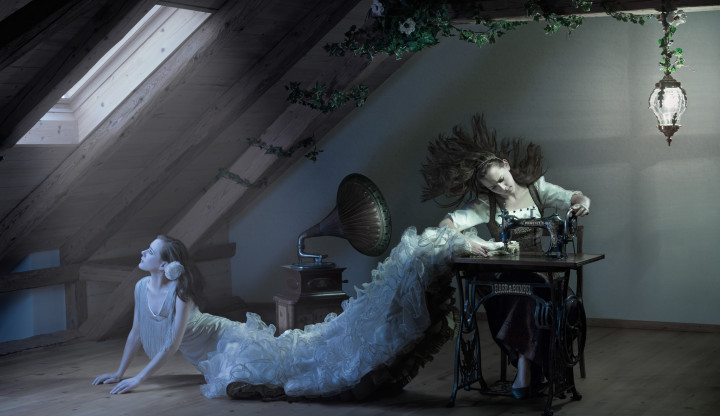
Our biggest and most stressful project in life may be the reinvention and reformation of our own selves. The path is often littered with self-doubt, and it takes real courage to plow through struggle after struggle. The “Seamstress Of Her Own Destiny” tells the true story of a young woman’s dream to become a professional flamenco dancer. She takes her dream very seriously and devotes most of her time and energy to training. But still, she never quite feels that her efforts will suffice. After our kickoff meeting, I developed the concept based on an earlier idea of mine: An old woman sewing a long dress that flows onto the floor and ends in a young, beautiful woman, the old woman’s former self. However the concept of “sewing oneself” could perfectly be applied to the flamenco dancer’s story. In the following weeks, the two main characters were established and a number of rough sketches drawn. A woman in a peasant’s dress is sitting in a dark room and working very hard and desperately on an antique sewing machine. A second woman of ethereal beauty, wearing a gorgeous flamenco dress, is rising from the floor, like a flower growing towards the light of the room’s single window. Included props: A gramophone to signify the relevance of music in the story, and green ivy to signify the process of growth as well as to close a visual loop between the two women.
-
- First sketch

-

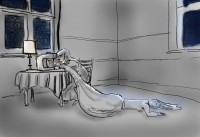
- Final sketch

The Zone-Lighting Process
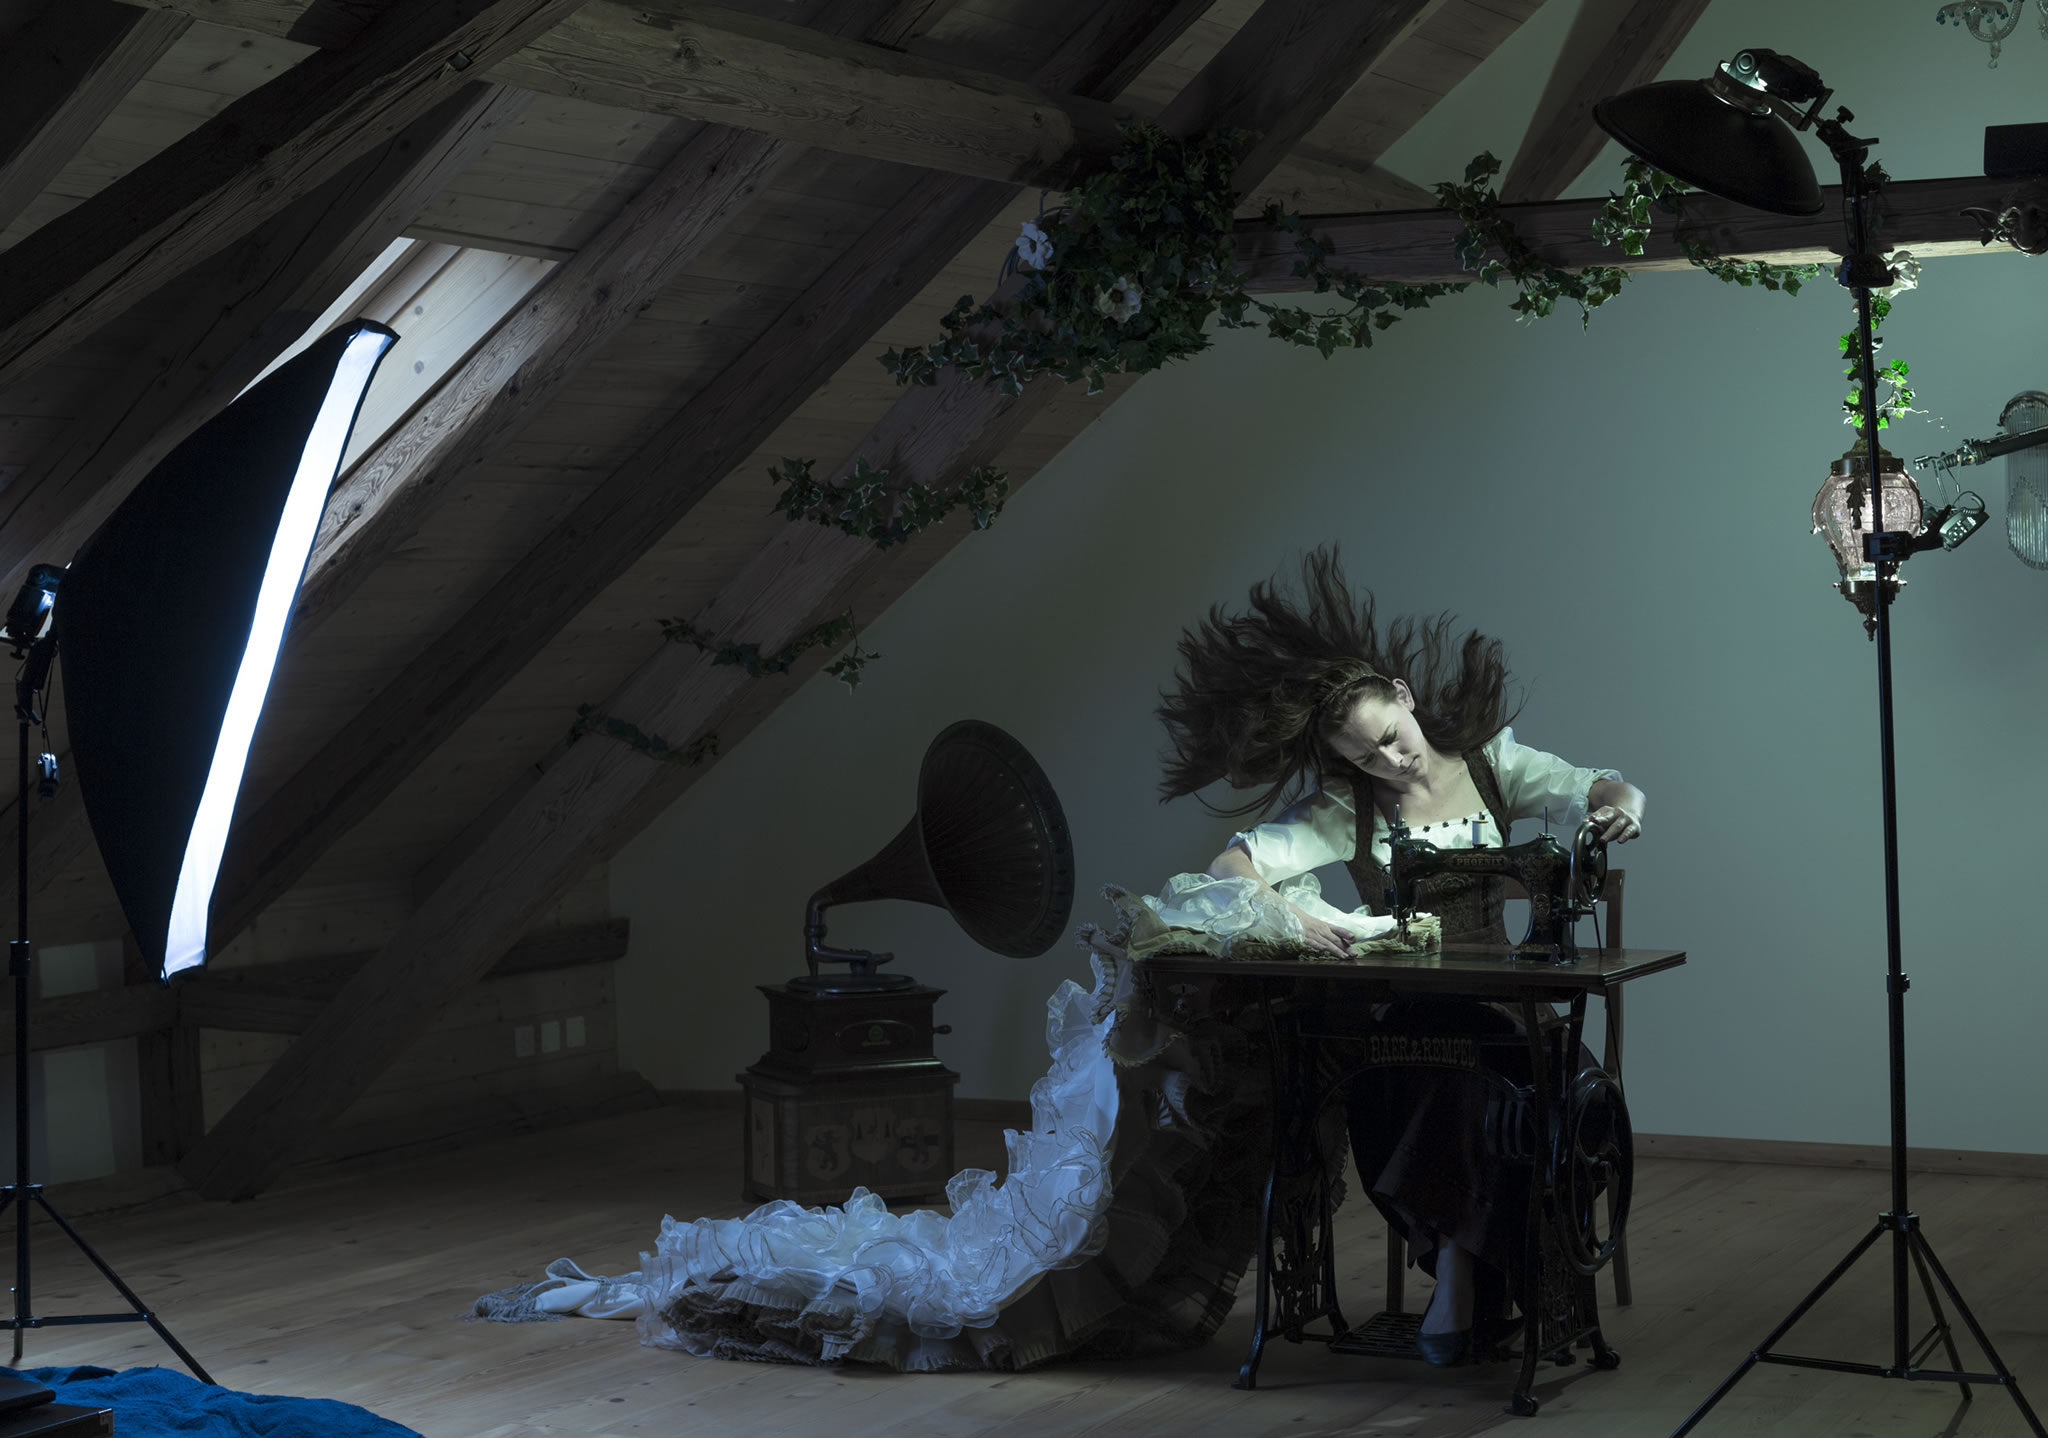
The photo was shot using only three small speedlights, following a work process I call “zone-lighting”. The inspiration for this technique is the “plate shot” commonly used in commercial photography. Before shooting, I had split the scene up into different zones: persons, props, decorative elements, parts of the room (like the back wall or the ceiling), important transitional zones (e.g. the extended white skirt from the table down to the floor) or simply areas that I needed to light separately for practical reasons.
After the initial setup of the whole scene, making sure everything was in place and in visual balance, I started to work through the zones from back to front – much like a painter covering the canvas layer by layer. My DSLR was locked on a sturdy tripod and tethered to my iPhone using an ad-hoc WiFi connection, so I was able to adjust the lights, trigger the shutter and immediately see the result on my phone display, using the “EOS Remote” app. Working with zones had two major advantages. First, I was able to focus my attention on one image area at a time in order to light it beautifully and with purpose. Furthermore, it didn’t matter if my light stands were somewhere inside the frame, as long as they weren’t in the zone I was currently working on. I just had to make sure to have complete scene coverage with all my zones and that the lighting quality, angles and intensities weren’t too different between neighboring zones.
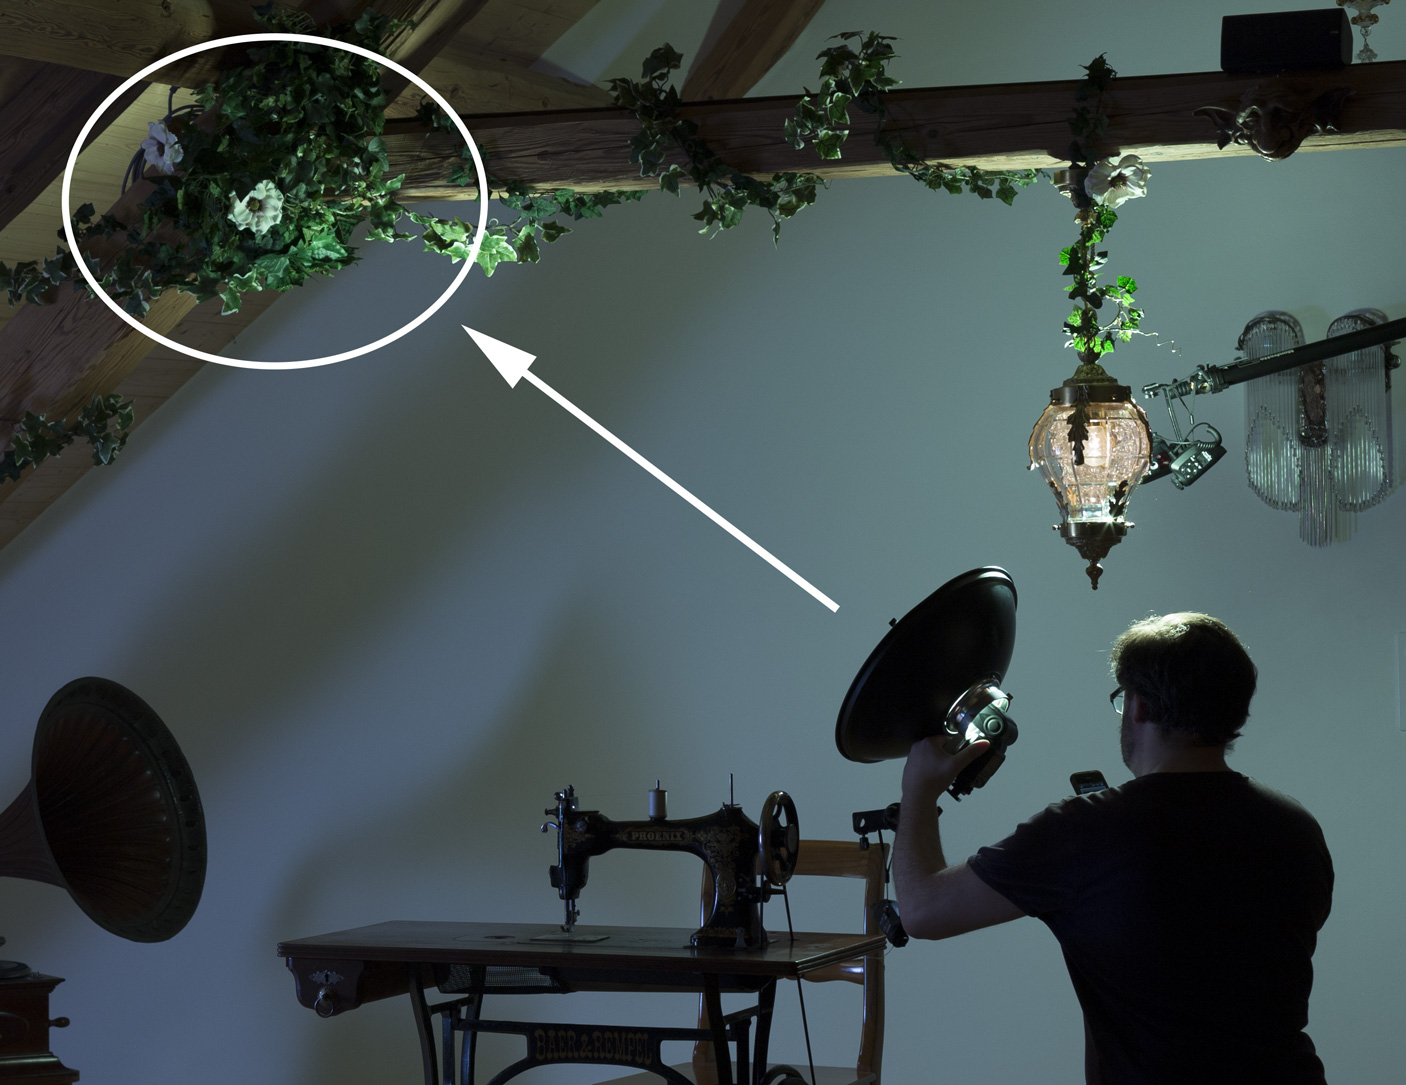
-

- zone lighting the ivy
-
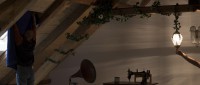
- zone lighting the gramophone

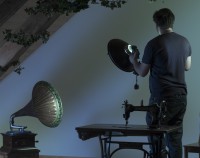
-
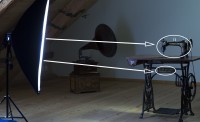
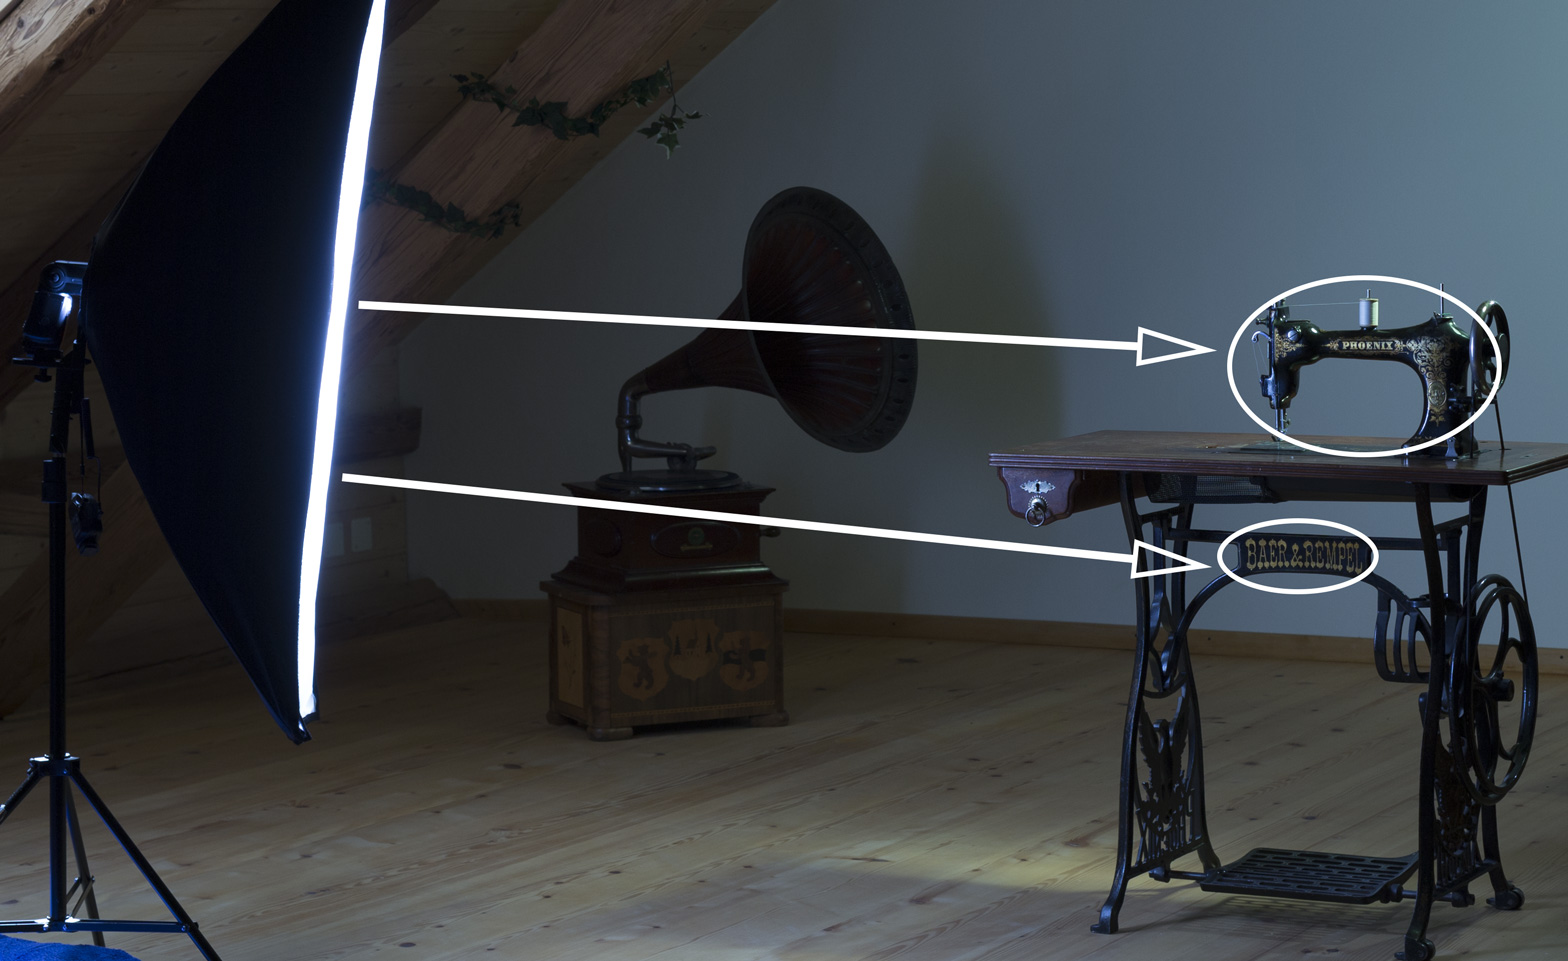
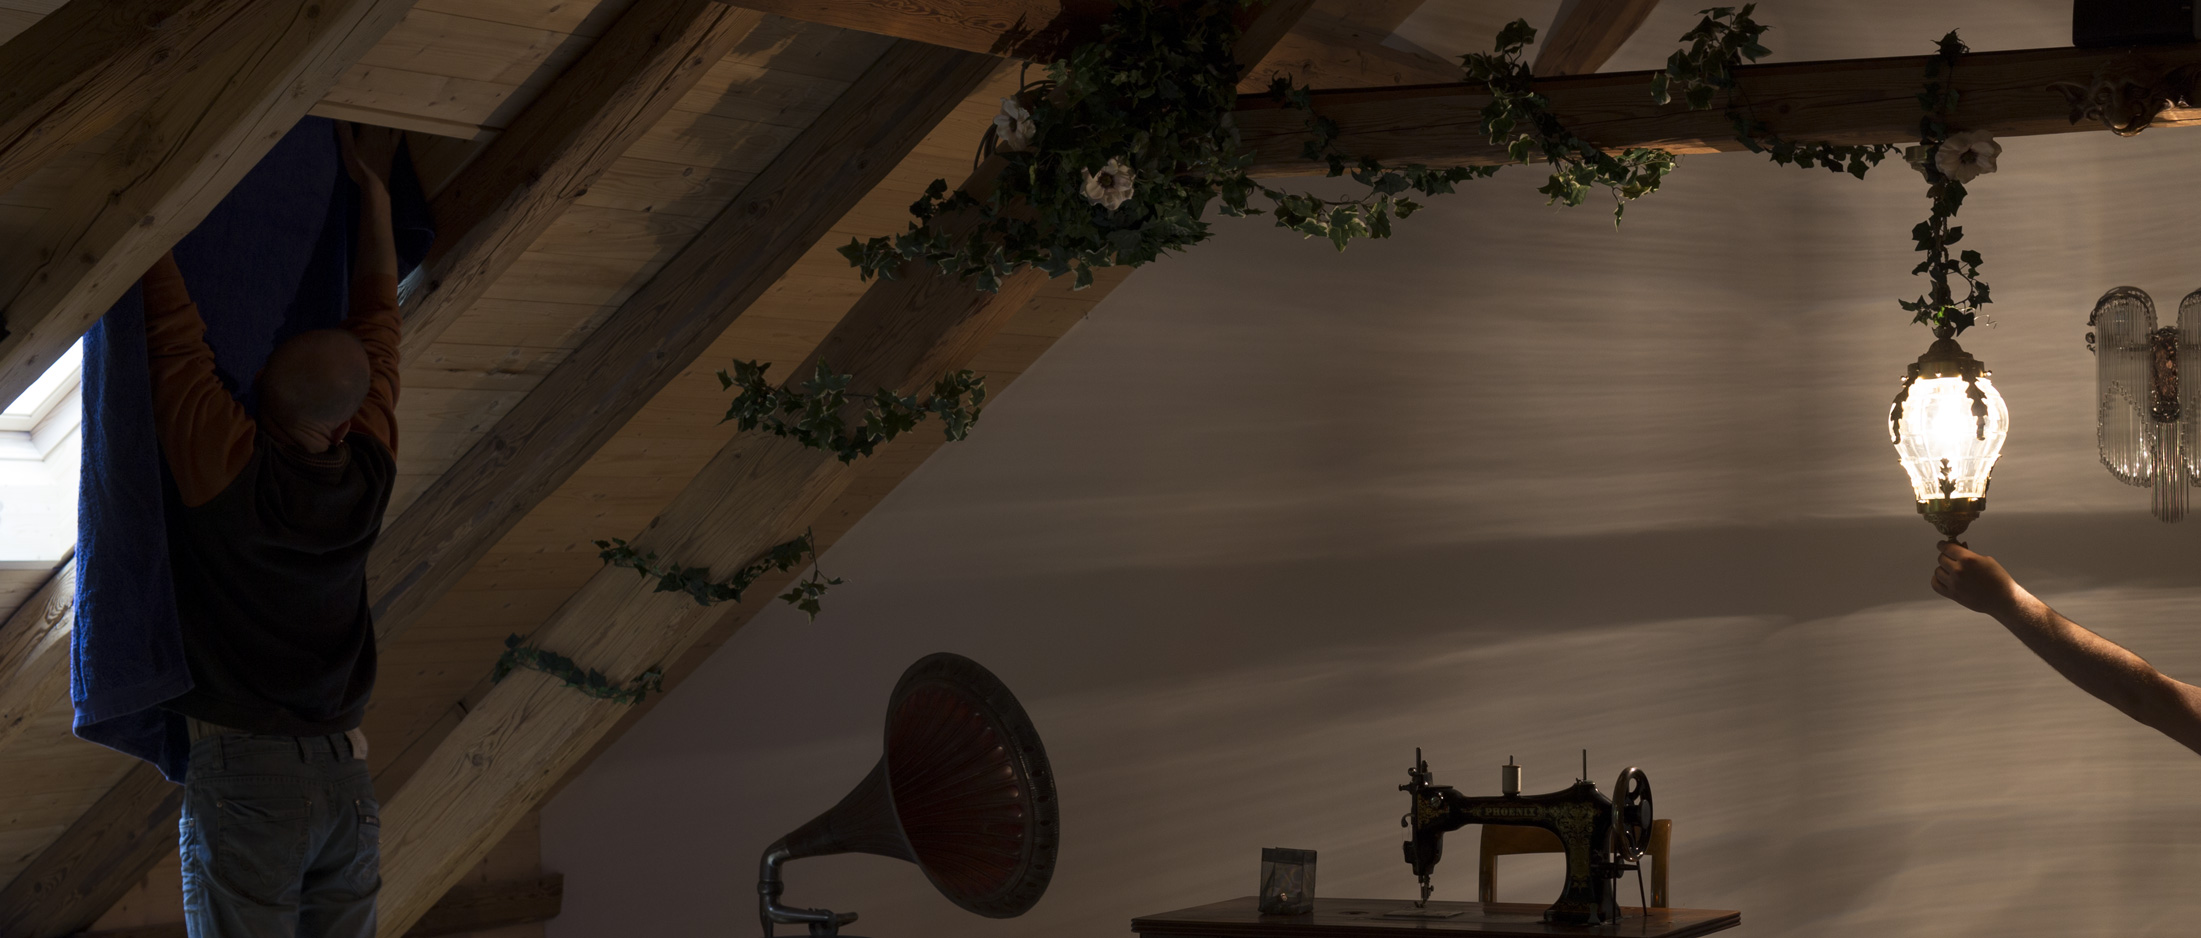
- zone lighting the front of the sewing machine
-
- zone lighting the woman on the floor
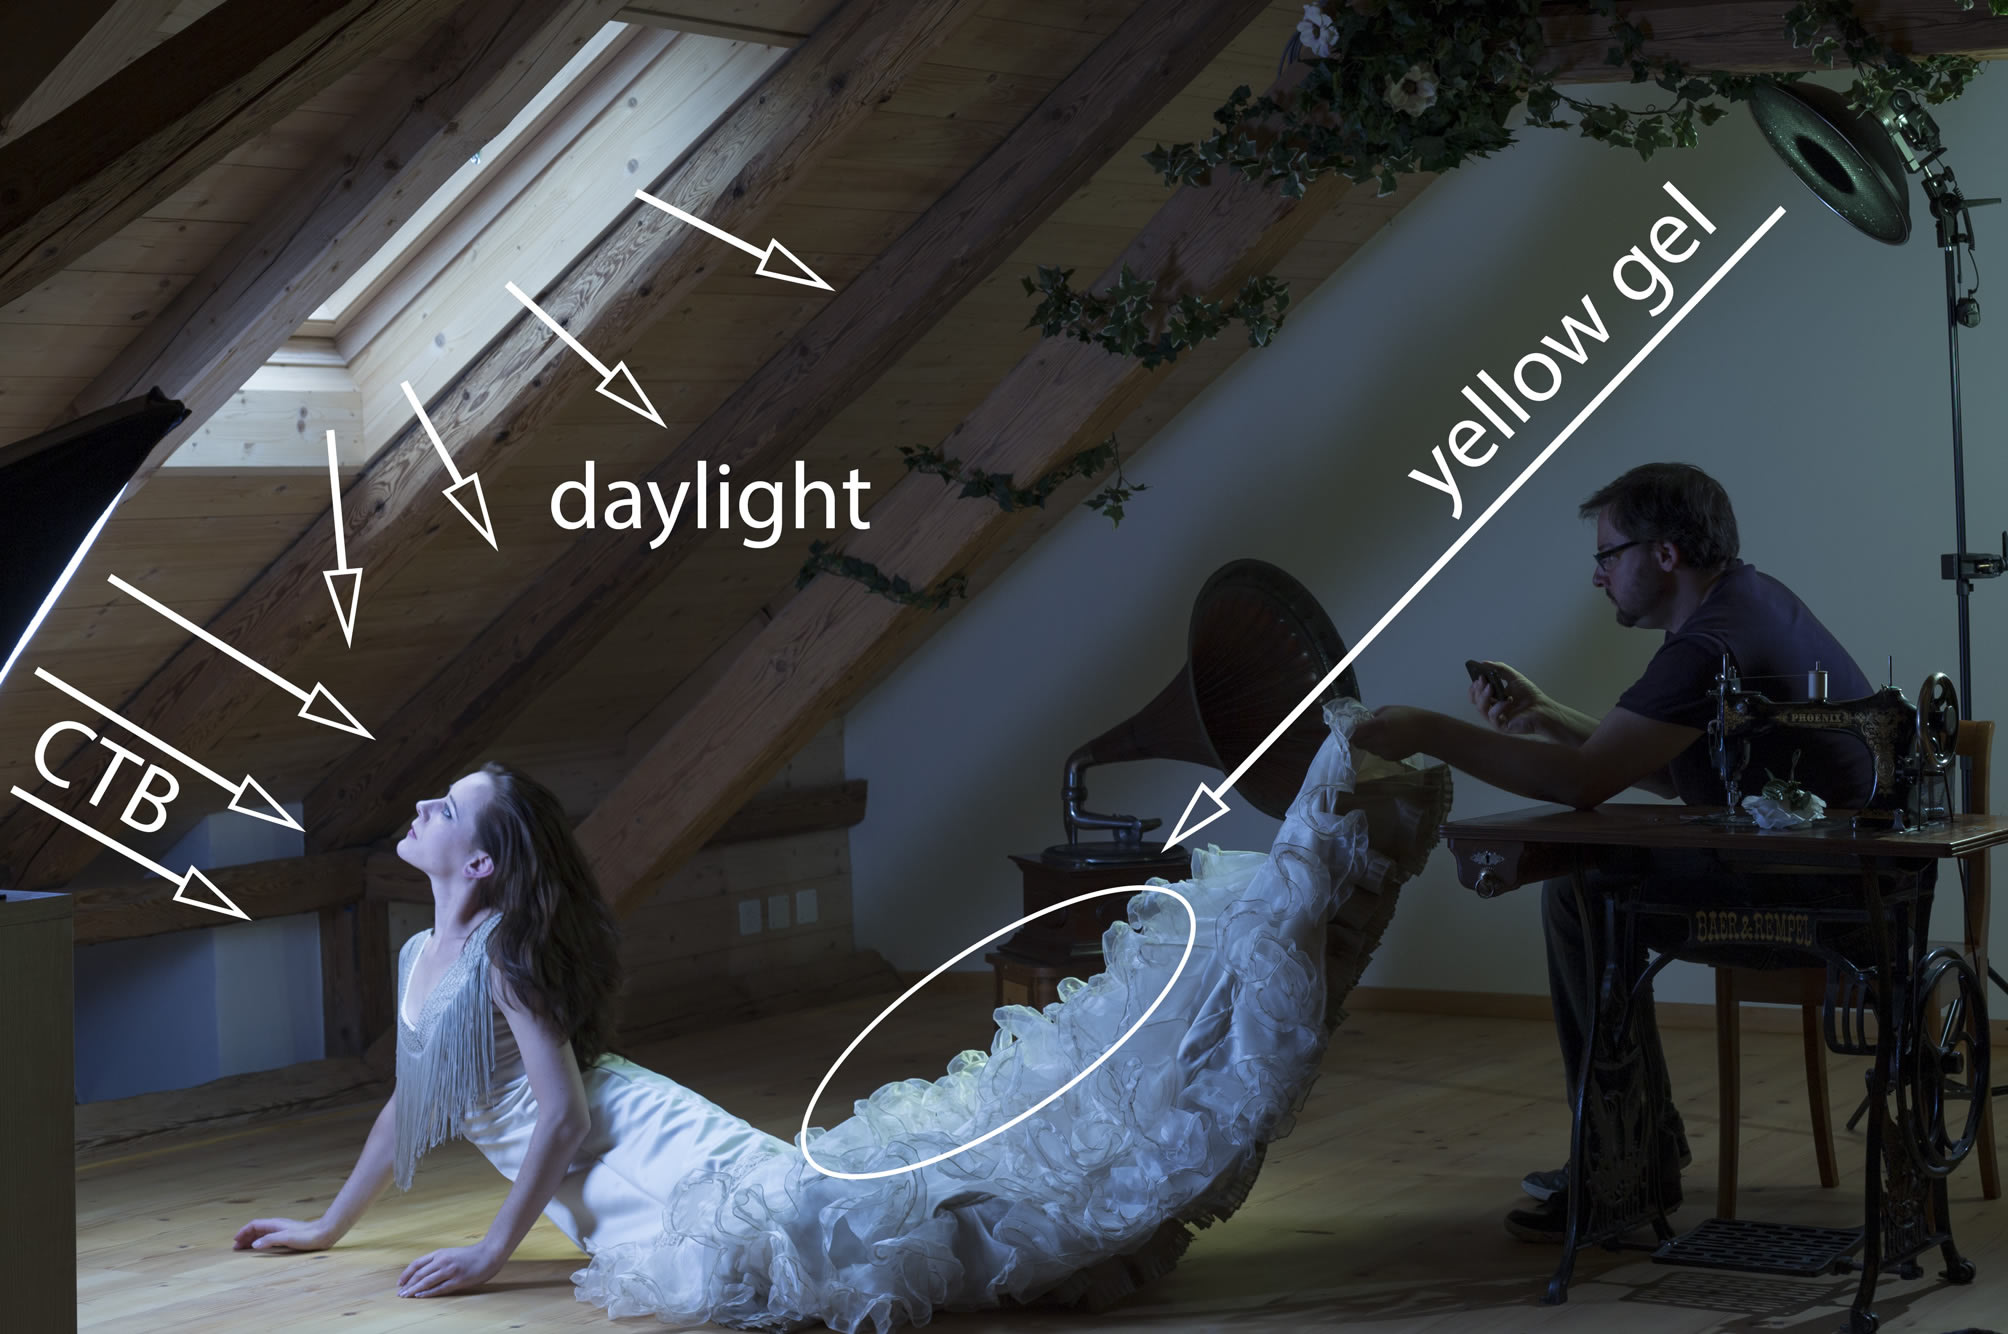
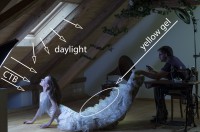
For the color scheme, I decided to go for a range of cooler color temperatures to underline the mood of the story. I set my camera’s white balance to tungsten, which shifted all lights towards the blue spectrum, including the afternoon sunlight. On the right side of the frame, I added yellow gels (not CTO gels) to the two speedlights and the tungsten white balance transformed their hue from yellow to a pale green. These two strobes and a little bit of trickery were used to mimic the light emanating from the lamp. The backside of the lamp was covered in aluminum foil. Into this reflective surface I shot a speedlight from further behind the lamp. The flash hit the round surface of the aluminum foil and spread to the back wall, ceiling and floor. By mounting that speedlight on a horizontal boom, I made sure the shadow of the stand would fall on an area which would be easy to remove in post. For the lamplight facing the camera, I used a separate speedlight in a beauty dish to direct it wherever needed within a certain zone. I added some example shots to this tutorial, where you can see how I lit different zones separately. To achieve maximum control on the window side, I placed an upright striplight modifier with a speedlight inside next to the window. I kept it there for most of the zones, just pulling it a little closer for the detail shot of the front of the sewing machine.
-
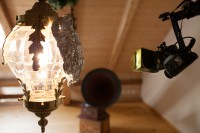
- mimic lamp light

-
- natural lamp light pattern
My model had very little prior modeling experience, but as a dancer she had a highly developed body awareness. When I directed her into a certain pose, she would fall back into it every time, even while throwing her hair back simultaneously. She also managed to push herself up from the floor without looking strained by focusing on being drawn towards the light. So it was rather her back that held her up, while her hands and neck were able to relax.
Post-Production
My post-processing approach can be summarized in these consecutive steps:
- Compositing (saved separately and flattened for use as a starting point for the next steps)
- Beauty Retouching (on her skin, eyes and eye lashes)
- Light dynamics (darkening backgrounds, brightening foregrounds, adding a glow around the lamp and a light beam from the window)
- Color (desaturating the image, especially the red tones from the wooden bars, careful balance of the blue and green side of the image)
- Texturing (a subtle surface texture was applied to the back wall and blended with the natural light pattern from the lamp without the aluminum foil)
- Selective Sharpening (only in key areas, like the: facial expression, patterns in the costumes, brand lettering of the sewing machine).
When combining the images I shot in the zone lighting process, I used either masking to tell photoshop for each photo where its zone is (the part of the image, where I was focussing on in that individual exposure). Under ideal circumstances it’s sufficient to use simply a “lighten” blending mode, because it will simply ignore all pixels that are darker then the pixels of the layer(s) underneath. More often then not, the light equipment still needs to be manually masked out though.
This technique has it’s problems though. Moving objects (like leaves in the wind) will create ghosting (the same way they would in a multi-exposure HDR), also if your camera is not 150% solid on the tripod, using lighten mode will accumulate the noise of all the exposures and of course make the compositing process much more tedious. Wind is the main culprit of camera shake, but even a wooden floor that ever so slightly wobbles can cause problems.
My team and I are really happy with the result and I’d like to thank my model and inspiration Daniela, as well as Roni and Tino, who provided us with the perfect location and props for this shoot with their lovely little museum for antique sewing machines in Dürnten, Switzerland (www.lihaga.ch).
Technical details
Camera: Canon 6D
Lens: 50mm F/1.4
Aperture: F/5.6
Exposure: 1/50s
ISO: 200
Flash: three small speedlights triggerd with PocketWizard PlusIIIs (see above text for details)
Modifiers: Lastolite Hotrod Stripbox, Sambesi beauty dish
Color Balance: Tungsten
Post-Production and Compositing: Adobe Photoshop CS6
Tripod: Manfrotto MT057C3 + MH057M0-RC4
Please check out the previous exposé post about this image for a full-size version of the final image.
Zone-lighting for the woman on the table (from camera RAW)
Copyright notice: This article or any of its content may not be reproduced without permission of the author.
Fantastic. N good job. I really like it.
Interestingly, Adobe and Researchers at the Cornell university have just published a variant of this technique called “computational lighting design”. Article source: https://www.engadget.com/2013/08/22/computational-lighting-design/
[…] John Flury creates a surreal, conceptual photo using “Zone Lighting” and plus III radios. This one is titled “Seamstress of Her Own Destiny.” The original report on the shoot appeared right here. […]
[…] This was done by zone-lighting the scene cautiously — a method I’ve written about in my own weblog. To sum it up, it is basically this: strobe-lighting the scene from distinct angles in a number of […]
[…] A full (technical) tutorial on this project can be found here https://obsoquasi.ch/zone-lighting-tutorial/ […]
[…] JF: There is a certain style of lighting I use very often. I like to call it zone-lighting. It’s not exactly an invention of mine, but I haven’t seen yet many people use it the same way – except maybe in architectural lighting and product photography. It’s a mixture of lightpainting and exposure blending. For this technique I trigger my camera remotely while lighting the scene manually with a hand-held flash, one exposure at a time. Picture by picture, I paint the light using my flash, concentrating on one zone of the image at a time. I usually start with the background and then work myself toward the front – similar to a painter. I have to watch that neither myself nor any light stands are inside the image zone I’m currently working on. Any clutter outside this zone is irrelevant because I’m only using what’s inside the specific zone that is relevant in a particular exposure. This works really well and lets me create complex, beautiful lighting for the whole image. There is a tutorial on my webpage for whomever is interested: https://obsoquasi.ch/zone-lighting-tutorial/ […]
I recently saw the article in Retouched magazine about this image and found it so great that I wanted to follow the link for the technical overview. It reveals that it is really true that you do not need at all expensive equipmemt to get killer results. Love the story behind this image. Well I have to admit that when I looked at it I did not realised that the both girls in the picture were the same model because their facial features looks different. So the story got more sense when I read the articles. Anyway just congratulations on the creating of this image, and for sharing such good technical and educational info about it
Dear Paul, thank you so much for your kind comment! I’m happy that you enjoyed reading this tutorial. It’s true, it can be a tall order to expect the viewer to understand a conceptual photo just the way I envisioned it. I’m trying to work towards being clearer in the way I stage the image, but on the other hand, it’s also okay that viewers build their own interpretation. That’s the lovely flexible nature of art. i’m also still a little bit on the fence where the line is between a story being too complex and when, on the other hand, it’s so trivial that it stops being a story altogether.
Kind regards,
John
Hello! In my opinion light is the most important part of every photo! I know a lot of cases when it just damages great pics! I don’t know how to choose righ lamps for studio photos? Which brand do you use? I like your photos and most of them are perfect for me! Tell me please, do you know something about *link-removed*? They have a lot of different variants, and also floodlights and i think if it appropriate for house and even for garden it is possible to use for photography too? What do you think about it?
Hi Daniel,
first of all sorry for removing the link from your message, the company you mentioned is not suited for photographic work. It all comes down to the difference between available/continuous light and flash light. The reason why you (as a photographer) should almost always choose flash is its color spectrum. Flash illuminates evenly across the whole color spectrum – continuous light, especially consumer grade lights that are being sold by the company you mentioned, will not produce accurate color, worse, it will even have some missing color frequencies. So basically your camera will become color blind, if you use these lights. So I highly suggest, you go for flashes – you could either go with speed lights or studio strobes (both are flashes). Speedlights are small, mobile, comparably inexpensive, but not as powerful. Studio strobes are very reliable, have great accessories to shape the light, are powerful. Acessories or more commonly called light modifiers are light shapers that you put in front of the flash. These really define how soft the light is, how it fades off (fall-off), how focused it is, etc. If you’d like to get started with flash, I recommend David Hobbies Strobist page, he even has a beginners class for lighting, where he shows how to use inexpensive speedlights to create very good lighting: https://strobist.blogspot.ch/2006/03/lighting-101.html. I’d start there and then if you notice, that you need more, go for a stubio strobe, like Elinchrom – which to me is the company that offers the best compromise between affordability and quality. And, they are based in Switzerland! 🙂