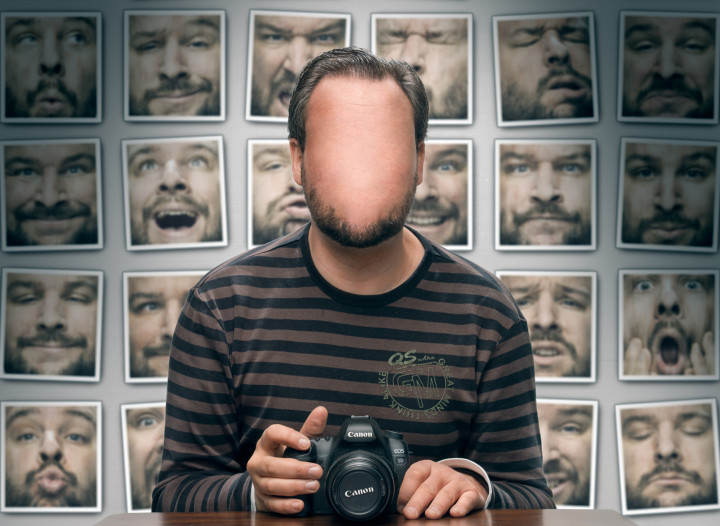
The Idea behind Overexposed
Native Americans believed that taking a photo of them would steal their souls. In this project, I tried to imagine a world where the loss of self due to exposure to photography is a physical fact. If you think about it, it not so far fetched after all. Just look at the media’s hunger for sensation, celebrities and gossip. A certain kind of press worker/photographer has been compared to a piranha before and people have often felt violated by their aggressive media vampirism.
The title is a play on the double meaning of the word overexposed. Of course for us photographers it means exposing your sensor (or film) too long to light, resulting in a washed out analog photo or blotchy white blobs in digital photography. But it could also mean the way we are exposed to our social environment, other people, criticism and scrutiny, etc. Overexposure in that sense can also lead to a sense of emptiness, feelings of inadequacy and loss of identity and self-worth.
Setup
I am sitting behind a short (low) coffee table with a laptop to my right from which I trigger the Hasselblad H4D-31 using the Phocus software. Luckily, there is a slight delay between pressing the “Capture” button and the shutter release, so I can get into position. Behind me are two large V-banks, for which I’ve written a do-it-yourself blog post recently. The model camera in my hand is my trusty old Canon 5D mark II, a piece of my soul on its own. Sadly, since I got the 6D, I hardly ever shoot with the 5D mark II anymore, so I thought it deserved a little time in the spotlight.
There are three studio strobes in place, all Elinchrome D-Lites.
- (Mainlight) medium octa in front and above, mounted to a boom. No Grid.
- (Hairlight) standard reflector bowl with a grid above me and slightly behind, sort of peeping over the top of the V-Banks
- (Kicker) standard reflector bowl pointed on the vinyl floor in front of the table to get some details into the front edge of the table
Camera and Settings
Hasselblad H4D-31 w/ HC 55-110mm lens (shot at 100mm). F/16, 1/500s, ISO 100
This is my first “official” picture with a digital medium format camera. And there are multiple reasons why I love it. X-Sync Speed of 1/500s and up, can go as high as 1/800s in the right conditions. The look of the images, not just the colors but this wide, illustrative look. Dislikes: Heavy, ISO goes beyond 100, but you shouldn’t use it and of course a crinchworthy investment. Eventhough it’s the smallest of the H4D series, the files are still huge (coming from a 20.1 MP 6D). My Photoshop crashed like 5 times because it couldn’t handle the 40 layers needed for this composition. I have to rethink my workflow a little bit for this one. A bit more systematic and controlled. Which in the end is a good think anyway :).
Post-Production of Overexposed
- Selected a shot for me sitting at the table, expanded this shot by using a table from another more wide-angle shot. Filled in the rest of the missing background with Content Aware Fill
- Removed facial features with a mixture of Content Aware Fill, Cloning and lots of dodging an burning to even out the irregular luminosities created by the cloning.
- More retouching and dodging and burning (sculpting) to create depth on the face and the clothes
- Applied the same raw processing adjustment on all faces, including the crop, which just had to be shifted manually for every photo
- Created a PS action to agen the faces: New 50% gray layer in Overlay blending mode. Added monochromatic noise, Remove Scratches, motion blur, vignetting, save as tiff, close file.
- Used the align and distribute feature in PS to place the fotos on the background, but then manually changed some of the angles. Created drop shadows for all face-portraits. Applied a lens blur on all background photos to separate them from the faceless me in the front.
- Created a beam of light using a curve adjustment and painted mask.
- Some fine touches in color, local sharpening
Here is the link to the final photo (down-sized to 20%, because it would have been a 17 MB JPG).
I hope you aren’t as creeped out by it, as I am 🙂


